The meal distribution round
The distribution round follows each meal all the way to the resident: who eats where, who has been served, who is absent, and how much each one has eaten. Resthome offers two complementary tools, both in the Meals → Operations app:
the tablet assistant (Quick distribution button) to check off residents one by one on screen;
the printable distribution sheets by sector, as a paper solution.
Before distributing
The meal menu must be in the Confirmed state. The meal services (one record per resident and per meal) are created automatically when you start distribution — no need to enter them by hand.
1. Open the assistant from the confirmed menu
Go to Meals → Operations → Menus and open the menu for the meal concerned.
If it is still a draft, click Confirm: the Start service and Quick distribution buttons only appear on a menu in the Confirmed state.
Click Quick distribution (tablet icon). The assistant opens in a full-width window, suited to a touch screen.
Start service or Quick distribution?
Start service creates the meal services for all residents and opens their list. Quick distribution does the same preparation, then launches the check-off assistant directly. For the round, use Quick distribution.
2. Filter and load the round
At the top of the assistant, three settings frame the round:
Menu — pre-filled with the menu you started from.
Sector — optional: limits the round to one sector (a wing, a floor).
Location — restricts to residents served in the dining room or in their room; leave it on all locations to see everyone.
Click Load to (re)build the list. It is sorted by sector, then room, then resident, in the order in which you will do your round.
3. Review the residents
Tap a resident to open their card: photo, room, sector and diets. Four large buttons let you check off in a single tap:
Button |
Effect |
|---|---|
Served |
Marks the meal as served and moves on to the next waiting resident. |
Skip |
Moves on to the next resident without changing anything (to handle later). |
Absent |
Marks the resident absent (not served) and moves on to the next. |
Room |
Indicates the resident eats in their room and stays on their card. |
The Full list tab shows all residents with a colour code: green = served, greyed out = absent, red = critical alert, orange = warning. Each row also carries its Served and Absent buttons for a quick check-off without opening the card.
At the top, a progress banner counts live: served / total, waiting, absent and the completion percentage.
Critical allergy alert
A red banner flags a serious incompatibility between a planned dish and the resident’s profile. Resthome refuses to mark as “Served” a service that includes a critical allergen until the dishes have been adapted. See Menus, diets and hydration.
4. Record the amount eaten
The percentage eaten is recorded on the resident’s meal service (it is not part of the check-off assistant):
Open Meals → Operations → Meal services and select the resident’s service.
Fill in the Amount eaten field:
Option |
Meaning |
|---|---|
Not eaten |
The resident ate nothing. |
25% |
About a quarter of the meal. |
50% |
About half. |
75% |
About three quarters. |
All eaten |
Meal finished. |
The amount eaten is not just a note: combined with the dishes served, it calculates the actual intake (energy, protein) that feeds the nutritional coverage on the resident’s record. See Nutritional tracking.
Low intake and families
If a resident has eaten 25% or less and their family is subscribed to meal notifications, Resthome can send an automatic alert. This option is enabled per resident. See Family portal and kiosk.
5. Close the round
Click Finish (or Close) to leave the assistant.
On the meal menu, you can then click Mark served to move the menu to the Served state.
Traceability
A served service and a Served menu can no longer be deleted: Resthome keeps them for traceability. Instead, correct the information on the existing record.
The distribution board (by location)
In addition to the tablet assistant, Meals → Operations → Distribution opens a kanban board of the day’s services grouped by location (dining room, in-room, absent). Each card shows the photo, the room, the sector, the diet badge and, where applicable, an Alert, Warning or Served badge.
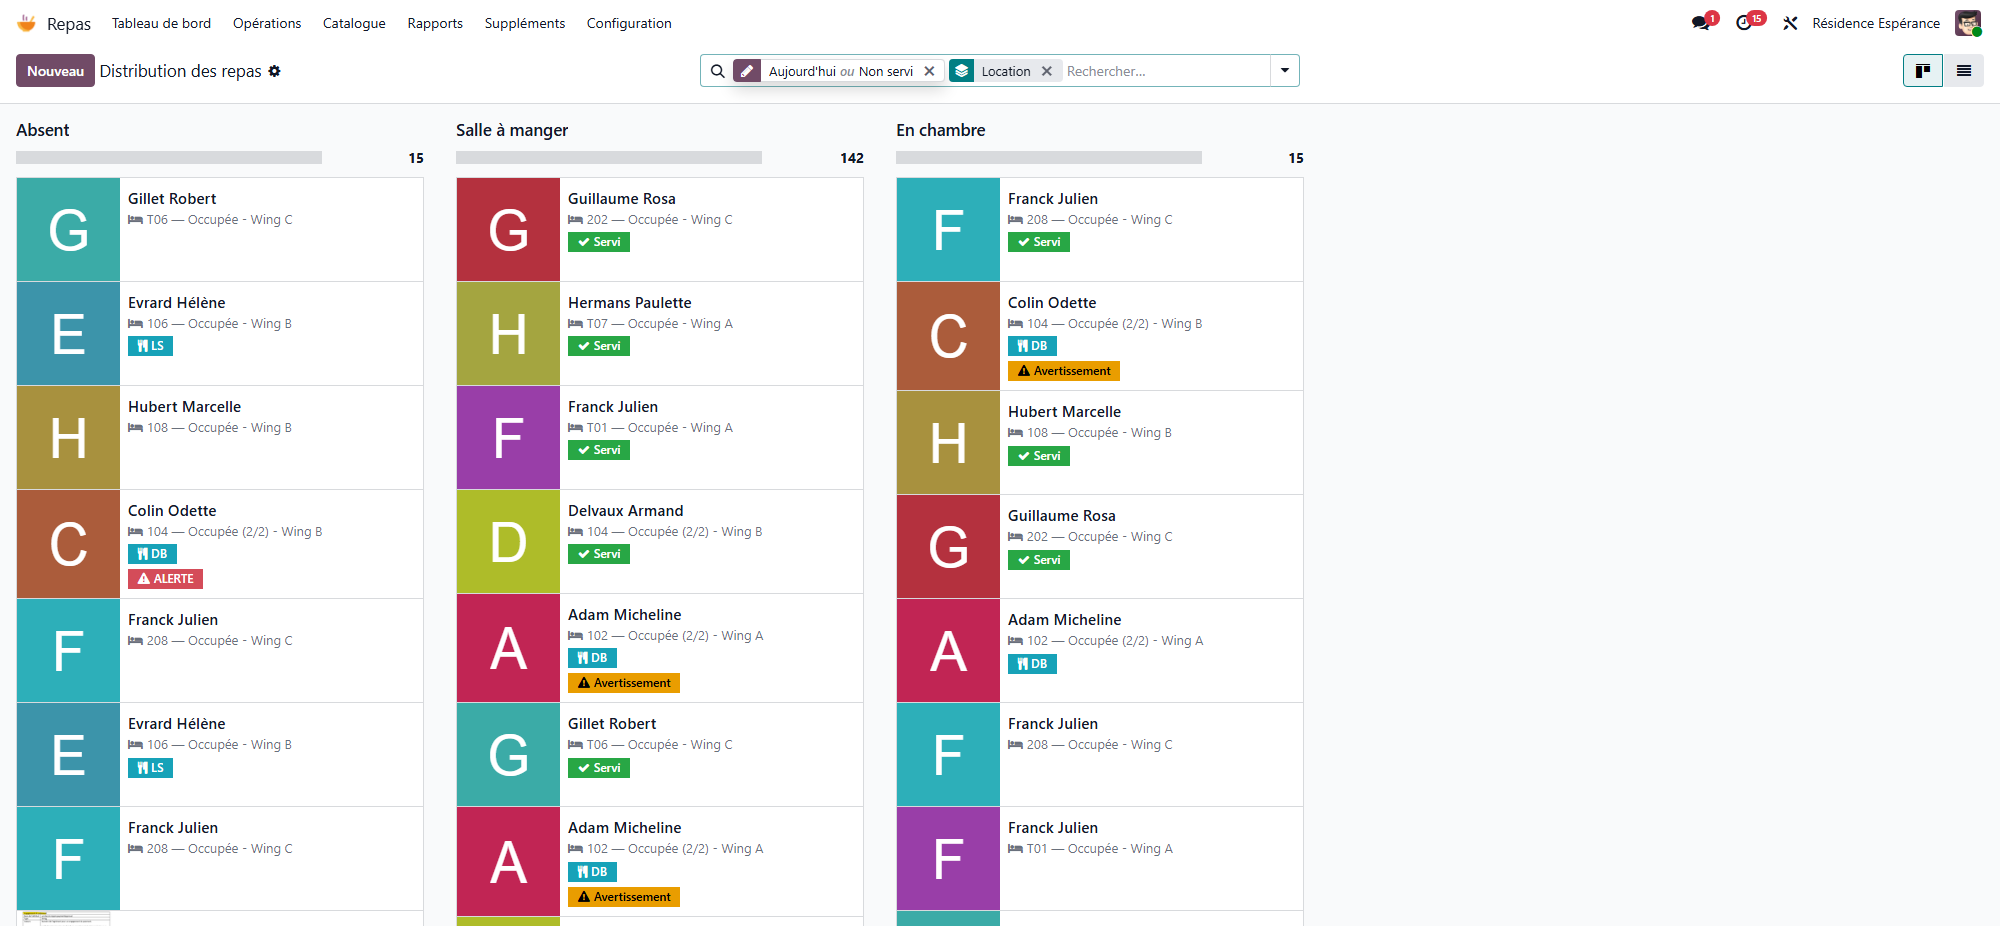
From the meal services list, two header buttons let you act on a multiple selection: Mark served and Mark absent. The Action menu also offers to mark services as in the dining room or in the room.
The printable sheets by sector
When you prefer paper, print the sheets from a menu (form or list view), via the Action menu: you can print the distribution sheet for one meal, or all the sheets for the day. Resthome creates the missing services along the way, then opens the document.
The sheet is laid out as follows:
one page per sector, with a header: sector, meal type, date and number of residents;
a table: #, Resident, Room, Diets / Allergies (blue badges for diets, red for allergies, “!” for a critical alert), then checkboxes Dining room, Room, Absent and Served, and a Notes column;
a footer with a Supervisor signature line and the print date and time.
It is a field checklist: staff tick the boxes as the round progresses, have the supervisor sign, then transfer the information into Resthome.
Key points to remember
The round lives in Meals → Operations; it starts from a menu in the Confirmed state.
Quick distribution is the tablet assistant: four buttons Served, Skip, Absent, Room, with automatic advance to the next resident.
The Amount eaten (Not eaten → All eaten) is noted on the meal service and feeds nutritional tracking.
The printable sheets by sector (checkboxes + signature) are the paper fallback.
A served service or menu cannot be deleted: Resthome keeps the record.